
TL;DR: Pool construction moves through permitting, excavation, steel and plumbing, shell installation, decking, and finishing, with fiberglass projects typically done in 2-4 months and gunite in 4-6 months. Florida’s rainy season, local permitting requirements, and mandatory safety inspections all shape the schedule, and knowing what happens at each stage helps homeowners plan around the noise, mud, and waiting.
Once your contract is signed, pool construction can feel like a mystery. Crews show up, disappear for a week, come back, and suddenly there’s a hole in your yard with no water in it. Knowing what happens at each stage, and why, makes the process far less stressful.
This guide walks through what actually happens during a typical build in Lake County, Ocala, Belleview, Summerfield, Silver Springs, and Webster, including the permitting steps, inspections, and weather factors that are specific to Central Florida.
Before Anything Is Dug: Design, Engineering, and Permitting
Nothing structural happens until plans are drawn and a permit is issued. In Lake County, this means submitting signed and sealed construction plans, a plot plan showing lot dimensions and setbacks, and a site-specific plan showing pool size, depth, and distance from the house and property lines.
Permit applicants must provide two sets of construction plans signed and sealed by a Florida registered architect or engineer, two plot plans, and two site specific plans showing deck area, pool size, depths and distances from house and lot lines.
Plan review checks more than just dimensions.
Florida Building Code section 424.2 requires all pools to have an entrapment prevention system, which is checked during plan review along with sealed pool steel angle of repose details where required.
Retaining walls, if your lot has grade changes, need their own engineering.
Retaining walls that are not laterally supported at the top and retain in excess of 48 inches of unbalanced fill must be designed in accordance with accepted engineering practice to ensure stability against overturning, sliding, and water uplift.
Pool barriers are also part of the permit package from day one.
Barriers must be a minimum of 48 inches above grade, located no farther than the pool perimeter, and must not be climbable, meeting the spacing requirements of FBC 424.2.17.1.1 through 424.2.17.1.7.
For homeowners with young grandchildren visiting or families in The Villages and surrounding active adult communities, this barrier requirement is one of the most important parts of the whole process.
A four-sided isolation fence separating the pool area from the house and yard reduces a child’s risk of drowning by 83% compared to three-sided property-line fencing.
If you’re weighing how this affects your layout or budget, our Florida pool construction timeline guide breaks down each stage in more detail.
Plan review typically adds 1-2 weeks before a permit is issued, and this is also when most homeowners finalize financing. If you haven’t locked in a loan yet, it’s worth reviewing financing options before excavation begins so funds are ready when draws are due.
Week One: Layout, Excavation, and Site Prep
Once the permit is in hand, crews stake out the pool shape on your lawn and bring in excavation equipment. For gunite pools, this means digging the full footprint to the engineered depth. For fiberglass installs, the hole is cut to match the specific shell dimensions, since the shell arrives pre-formed and simply needs a precise cavity to drop into.
This stage is loud, muddy, and visually dramatic, dirt piles, trenches, and heavy equipment tracks across your yard. It’s also the stage most exposed to weather. Afternoon storms are a near-daily reality in Central Florida for several months a year.
Florida’s summer storm pattern typically brings clear morning skies, building humidity by midday, and a powerful afternoon thunderstorm between 2 and 5 PM that dumps 1 to 3 inches of rain in under an hour.
The rainy season in Florida typically begins in late May and lasts about five months, usually clearing out by mid-October.
Rain during excavation doesn’t ruin a project, but it can push back the schedule a few days at a time since wet, saturated soil isn’t safe or stable to dig or pour concrete into. A good crew builds buffer time into the schedule for this rather than pretending it won’t happen.
Steel, Plumbing, and Electrical: The Hidden Work That Matters Most
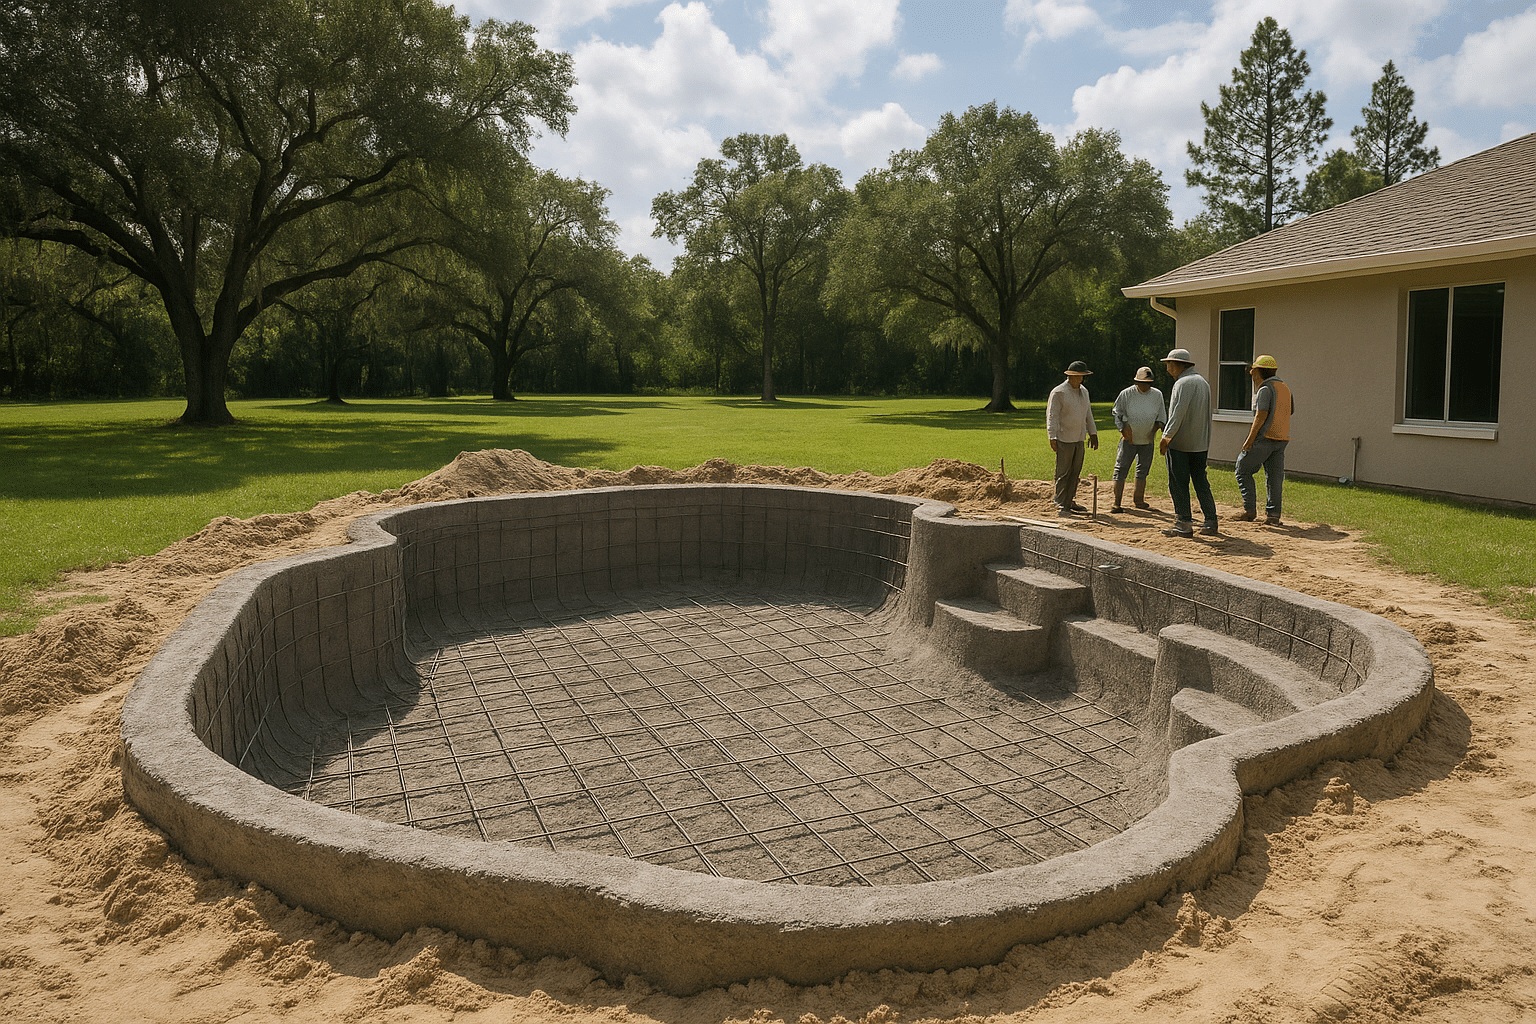
For gunite pools, once the hole is excavated, crews install rebar to form the steel skeleton of the shell, then run all plumbing lines for skimmers, returns, and main drains, plus the electrical conduit and bonding grid. This is the stage with the most required inspections, and for good reason, it’s the structural and safety backbone of the pool.
Local building departments check this work closely.
Inspectors verify electrical pool steel grounding, including bonding of pool lights and pool steel, with a minimum of four tails uniformly spaced around the pool perimeter using minimum #8 bare copper wire.
They also confirm
the location of the pool shell steel, verifying reinforcement bar size, lap, and spacing per construction plans, and that the soil is clean of debris and roots.
Electrical work gets extra scrutiny because of the obvious risk of combining water and power.
The National Electrical Code Article 680 governs pools and requires a dedicated 240V/50A service for major equipment like pumps and heaters, a mandatory bonding grid using an equipotential grid of #8 copper wire to prevent shocks, and GFCI protection on all outlets within 20 feet of the pool.
Fiberglass installs skip the rebar step since the shell is already structurally complete at the factory, but plumbing, electrical, and bonding inspections still apply in full.
Shell Installation or Gunite Application
This is where fiberglass and concrete construction diverge most visibly.
Fiberglass Pools
A crane lifts the factory-built shell, set and leveled in the excavated hole, then backfilled around the sides as water is added to the pool in a coordinated sequence. Because the shell arrives finished, this stage moves fast, often just a day or two, which is a big part of why fiberglass projects typically run 2 to 4 months start to finish.
Gunite (Concrete) Pools
Crews spray a mix of concrete over the rebar structure to form the shell, building walls and floor that are 6 to 12 inches thick depending on the design. Unlike fiberglass, gunite needs time to cure before the next steps can begin, which is one of the main reasons concrete projects typically take 4 to 6 months. The curing period also requires specific care, which we cover in detail in our guide to the first 30 days after your gunite pool is built.
Decking, Tile, and Interior Finish
With the shell in place, crews pour or install the deck, set tile at the waterline, and apply the interior finish, plaster, pebble, or quartz aggregate for gunite pools, or the factory gel coat for fiberglass. This stage is when the pool starts to look like a finished backyard feature rather than a construction site.
Deck work has its own inspection requirements.
Inspectors verify proper reinforcement and expansion joints on the concrete pool deck
before it can be signed off.
Equipment, Startup, and Final Inspections
Pump, filter, and heater equipment get installed and wired in, and the pool is filled with water for the first time.
A final inspection checks the water circulation system and certifies completion
before you can legally swim.
Barrier compliance is checked again at this point too, since the fence or barrier has to be fully installed and functional, not just permitted on paper, before final sign-off.
Why Timelines Shift in Lake County and Central Florida
A few local factors routinely affect pool build schedules in this region:
- Rainy season: June through October brings near-daily afternoon storms that can delay excavation and concrete pours by a few days at a stretch.
- Permit review backlogs: Local building departments process pool permits alongside new home construction, and volume varies by season and by county.
- Soil and site conditions: Sandy soil common across Lake County generally drains well, but high water tables in some areas (closer to lakes in Mount Dora, Tavares, or Eustis, for example) can require extra engineering for retaining walls or dewatering.
- HOA and community rules: Many communities in The Villages and similar active adult developments have architectural review steps that run parallel to the county permit, adding time before excavation can start.
None of these factors are unusual, and an experienced local builder plans around them rather than being surprised by them. If you’re comparing builders or researching new construction in your area, our Lake County pool construction page and Apopka pool construction page outline what a local build looks like in more specific neighborhoods.
What You Can Do While Construction Is Underway
- Keep kids and pets away from the excavation and the equipment staging area.
- Expect deliveries and crew vehicles to use your driveway regularly; clear a path if needed.
- Ask your project manager for a rough week-by-week schedule so you know what to expect next.
- Don’t landscape right up to the pool edge until decking and grading are finished, since final grade often shifts slightly from the original site plan.
- If you’re financing the project, confirm draw schedules with your lender so payments align with completed stages, not just elapsed time.
FAQ
Recommended Reads
- How to Finance a Pool in Florida: Loan Options, Lenders, and What to Expect
- The First 30 Days After Your Gunite Pool Is Built: Curing, Care, and What to Expect
- Florida Pool Construction Timeline: What Happens at Every Stage of Your Build
